How We Can Easily Print Digital Art
People who are exactly known as the digital artist and cant display or sell your work just without printing it out easily. So as ensuring that your work nicely looks the different professional when on the time you print it out is very important for your reputation as the artist first and nicely prepare your art of printing. For the quality digital printing art people should adjust the resolution and sharpness and also the contrast so the image is to make it and some kind of professional looking as it is possible for us.
Preparation of the Digital Files for Digital Printing
There are some kind of preparations we have to make before preparation and the digital files for digital printing for all of us. It is a complete thing for us to improve the ranking and will manage to settle with the needs of modern era in all around the world. Here you will get the easy steps for digital files for making digital printing.
Adjustment of the Resolution to Dpi 300 for the Fine Art Printing Option
Some kind of the things that actually makes a professional print that look some better and professional and is the sharpness of the resolution you see. Usually printing anything up to the thirteen in the length and width in CM right without adjusting the resolution from the good standard 72 dpi is normally applicable. Some important points are detailed as under
Just as resizing the image in the Sketchbook pro for the new android technology as Mac and then go to image then also choose size into the menu box that exactly come up and make sure. So as helpful nicely keep proportions and resample image are nicely for both check and easily change the resolution easily.
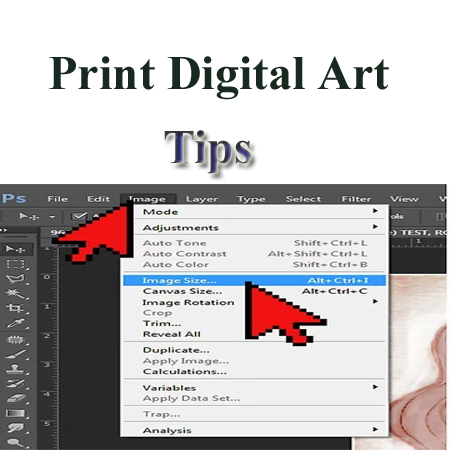
If the people are using Photoshop just go to image and then image size and must check the constrain lands and properties and the resample image boxes features then follow the image size at the bottom of the dropdown menu for different and unique measurements.
Adjusting the Color or Digital Print
On the time of adjusting resolution it can impact the color and texture of your print and also use the different options about the color and menu to readjust the different colors into the print to the originality of color and supporting points are mentioned
If people used custom colors into the original print and note down the numbers that correspond to various colors on photo shops color wheel so that actually give you a starting point right after the adjusting resolution.
Using Some Professional Software Plugins for Different Projects
People who are printing the digital art onto the various posters’ and banner or a different thing or quite similarly large project and might want to use a great plug into the size changing are skilled.
Some of the 2 plugins for nicely resizing are perfect resize and easily blow up nicely.
So as once you purchase the software online and the different dialog boxes will see pop up to guide you right through the process of installation.
Increasing into the Contrast to Brighten Colors
The term how to change the contrast on the specific art will be depend on the software you use and various of the photo editing software will exactly have a nice slide cursor. So that thing can use to change the contrast and will also increase the contrast beyond what looks sharpest onto the screen.
Increasing Of the Sharpness into the Photoshop
If we have some dim or highlighted photographs after the layer menu and in Photoshop right click on art layer and then choose different duplicate layer. With the adjusting sharpness this way is quite different from the other kind of adjustments. So as a high resolution allows eye to distinguish right between close further more elements into the photo and makes a complete photograph look very clearly.
Saving the Artwork as A JPEG or TIF
Completely saving the art like the JPEG or the TIF files present you the best quality right after you have made different changes and want to print your complete artwork. If you are using a JPEG file only save the artwork and into that specific and it is over and over can decreases the quality of the final products. Such kind of files would not lose quality over the repeated saves and then you can use a TIF file at any point.